Understanding more sensors : Ideas & Project Inspo

In my research and experiments on sensing motion, I’ve come to discover there are many ways to sense motion, and it’s probably best not to use an actual ‘motion sensor’

The Theremin is an electronic instrument controlled without physical contact, thus it is a real world example of motion sensing parts taking input and giving an output.  Take a look/ listen! 

thereminpic_custom-9d554abc953090a42ef8fd9b9b7a900bc18b6dc5-s6-c30.jpg
The theremin was invented in 1919 by Russian physicist, Leon Theremin

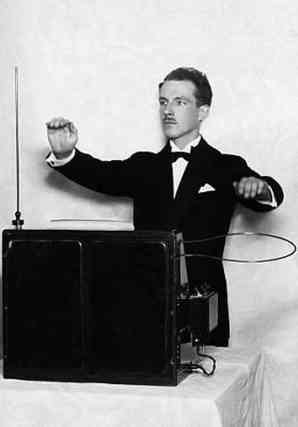
I was thinking touch capacitors would be best for a theremin but this Make tutorial uses a photo resistor and ultrasonic sensor.

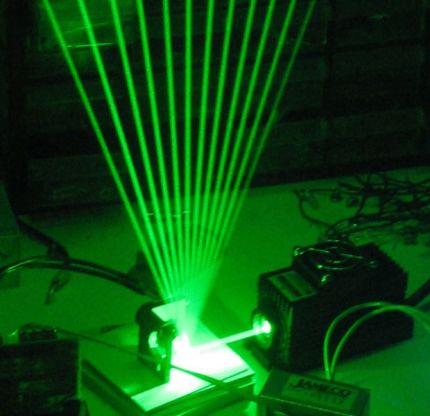
Then WOAH there are “laser harp theremins”

FIGO8CMHNTTEFYE.MEDIUM.jpg


RFID – is also an option for sensing interaction/motion!

RFID is used to wirelessly identify something. RFID is about reading tags that have a small amount of information stored in them.   They are super cheap and tags such as UHF RFID can be read from far away.  Passive UHF allows objects to be read across the room, and battery-assisted-passive and active tags can be read across buildings!

roll.giftag.jpg

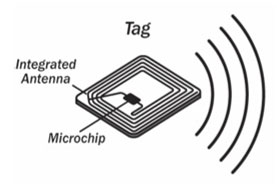
RFID will be important for the future of IOT(Internet of Things) systems. In the future every object may have a digital identity that rests in an ecosystem of identifiable objects by means of a prevalent network and mode of information exchange! how will this change the way we interact with the world??


More than one way to Arduino

Arduino does not just come in one form.  There are several you can choose on depending on what you want!

Here’s a few I’ve used:

48912-arduinouno_r3_front.jpg
Arduino Uno- the classic, a great starter Arduino for tinkering 


ArduinoMega.jpg
Arduino Mega- very similar to Uno but has more pins and capacties
LilyPad_Arduino_Main_Board.JPG
LilyPad- besides being prettier and smaller this Arduino is often used for wearable projects as the pins can be sewn to with conductive string
1222-03.jpg
Arduino Gemma is tiny and only about $10.  It still can do a lot of things and also draws very little power.  I’ve been using a small 350mAH rechargeable lithium ion battery! 


imgres.jpg
Arduino Circuit Playground – NEW! an all-in-one board that has RGB LEDs and sensors (including a sound sensor, temperature sensor, light sensor and mini speakers built in! ) for only $20! 

~also there’s ‘off-brand’ Arduinos that are cheaper but of course are riskier in terms of quality.  I bought the Elegoo version of the Arduino Mega off of Amazon for about half the price and it’s working just fine for me!


LED Strips

LED strips are amazing!  They are lengthy, bright, affordable and easy to manipulate as they are flexible and can be cut in increments.

There are two main kinds – strips whose LEDs are individually addressable, and strips in which all LEDs are addressed at the same time.

images.jpg1507_LRG-600x461.jpg

So you want to control an LED strip with Arduino…

What you need :

  1. LED strip – there are so many kinds and needs will vary!
    1. Today I am using Adafruit’s 30 RGB neopixel strip.  Neopixels are like LEDs 2.0, the controller chip is actually inside the LED itself, thus these are individually addressable LEDs!
    2. Adafruit’s Neopixel Guide!
  2. Arduino – need one with a fair amount of memory, I will be using the Uno
  3. Power Supply
    1. 5V DC Power supply 
    2. 3.7 Volt lithium-polymer battery – if you want it to be cordless for wearables etc. 
    3. don’t use higher than 6v you will fry the strip!
    4. if controlling more that 10 neopixels you cannot just power the strip directly off the 5V pin and your computer!! You need to hook up the 5V power supply
  4. capacitor (1000 µF, 6.3V or higher)
  5. resistor (probably 300-500 ohm)
  6. helpful videos
    1. https://www.youtube.com/watch?v=KaClIgAVuI8

Using LED strip – non individually addressable 

  1. need transistor any power NPN or N-Channel MOSFET – TO-220 Packages


Putting it together….. I still need a capacitor.. so to be continued …


Stepper Motors


FH2O7RUIB22QR8X.MEDIUM.jpg
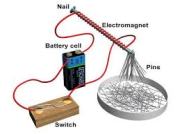
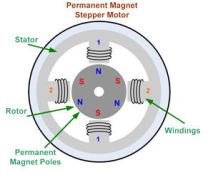
A stepper motor is a very magical motor.  That is because it works through electromagnetism. The shaft of the motor is mounted with a series of copper coils and magnets.  The copper coils are charged by an electric current in a sequence in order to activate and deactivate the magnets.  These forces of attraction and repulsion work to spin the motor!

url.jpg
you may have done electromagnet experiment like this in grade school!

Arduino is great for controlling stepper motors!  You can control speed of rotation extremely accurately in the code and with sensors!

Here is a great guide including code for stepper motors! 

LEDS+Sensors

So now’s the time for starting some real interactivity with lights and sensors!  Again my goal is to create sculptures with embedded lights and sensors that react according to the environment.

there’s a lot of cool sensors out there!

16-1-popular-sensors-modules-kit-arduino-raspberry-pi-techtronics-1606-09-techtronics@1.jpg
such as: tilt sensor, vibration sensor, laser head sensor, sound sensor, temp sensor, motion sensor, soil moisture sensor, flame sensor, clock module, path

For a simple example of an idea I have is to build a box (either with a material that is illuminated or has holes in it) then program LED lights to interact with a sound sensor, put it all in side and wallah! I think a lot of bands would like this for some good ambient set design!

IMG_8955_800x.JPG
I really love COZO’S shadow boxes and would love to make something similar but with an arduino with sensors and lights inside!

Something else I am working on involving lights and a motion sensor, so using the same design idea as above, I could have a box that gets brighter or changes color the closer someone walks to it.

I’ve gotten past the first step on this one with the help from here –>https://sites.google.com/site/summerfuelrobots/arduino-sensor-tutorials/ultrasonic-ranging-module-hc—sr04-rgb-led-module

LEDs 101

Image result for led diagram

LED = Light Emitting Diode

advantages over incandescent light sources = lower energy consumption, longer lifetime,  smaller size, and faster switching, variety of color and controlling capabilities!

RGB LED  = LED containing one red, one green and one blue LED

PWM = post width modulation is a technique used (in/with Arduino) for controlling the brightness of the LEDs, allows you to fade the LEDs, Arduino only has 6 pWN pins so you can only hook up 2 rgb LEDs at a time =[

-also PWM is what is called with AnalogueWrite() commands

-also PWM is used for driving a motor at various speeds

-has to do with frequency

RGB basic hookup +code

so many color possibilities!

fade 1 RGB LED


My experience

Hooking up one LED and experimenting with it’s color were fairly easy and satisfying.

Next getting the fade working was easy, hwoever understanding the fade code is much more difficult.

Next I want to control more than 1 LED, which I found to be more difficult than expected.

Other things you need to control LEDs

*resistors

*transistors